Basic ACM and Merge Tactics
(by Murdr)
Preface
One thing we want to keep in mind when discussing Air Combat
Maneuvers (ACM) is that the Basic Fighter Maneuvers (BFM)
involved take on a new objective when used against an opposing
plane. When we perform BFM absent an opponent, we are able to
complete the maneuver within 100% of its technical aerobatics
definition. Being able to "hit the marks" during a
maneuver to achieve aerobatic perfection is an important skill to
develop. However in that situation, our objective is to perform
an aerobatic maneuver correctly. In a sense we are performing
it just for the sake of performance.
When we add an
opposing plane to the situation, our objective becomes gaining gun
angles on the "enemy". So at this point we are now
performing BFM with consideration of the opponents position, not in
spite of it. As an example lets look at the Immelman (Basic Manuvers)
when starting it from a due South heading. At the half way
point of our Immelman (nose pointing
true vertical), our
Lift Vector (Flight Controls) should be pointing due North, and as
we come over the top we should be able to un-invert to wings level
heading due North. When performing the same Immelman
against an opposing plane, at the half way point we want our lift
vector pointing in the general direction of our opponent (wherever
that may be). As we come over the top, we want to orient our
lift vector toward our next turn, and our next turn is entirely
dependent on the "enemy's" position.
BFM are the building
blocks that we string together for ACM. With all of this in
mind, in later sections we may refer to BFMs
on occasions where only the majority of the BFM is performed
to its aerobatic definition. An excellent example of this is
the standard loop. We could break down the loop into two 180°
maneuvers, and consider them an Immelman, and a Split-S. The
180° turn performance on each halves of the loop are identical to
those two maneuvers respectively. The exit and entrance rolls
of the individual BFM may be missing, but their combat effectiveness
are exactly the same.
The Merge
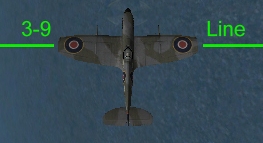 A merge happens when two
planes cross through each others best turn radius from approximate
opposite headings. More specifically “the
merge” usually refers to the point at which they cross through
each others 3-9 line.
In air combat it is often the case that after a merge both planes
will be attempting to be the first to gain a guns solution on the
other. In a way, you can consider the merge point a starting line for
ACM. There are ways to “jump the start” to gain an
advantage on your opponent, which we will get into a bit later.
Something to keep in mind is that “the merge” isn't just
the first time you and your opponent cross, but every
time you cross. Several merges can take place in a fight. The
initial merge can set the pace of the rest of the fight, but
advantages can be gained or lost just as easily during subsequent
merges. A merge happens when two
planes cross through each others best turn radius from approximate
opposite headings. More specifically “the
merge” usually refers to the point at which they cross through
each others 3-9 line.
In air combat it is often the case that after a merge both planes
will be attempting to be the first to gain a guns solution on the
other. In a way, you can consider the merge point a starting line for
ACM. There are ways to “jump the start” to gain an
advantage on your opponent, which we will get into a bit later.
Something to keep in mind is that “the merge” isn't just
the first time you and your opponent cross, but every
time you cross. Several merges can take place in a fight. The
initial merge can set the pace of the rest of the fight, but
advantages can be gained or lost just as easily during subsequent
merges.
Now let's take a look at
some things in general we would like to try to do during a
merge:
Avoid the opponents guns:
A well placed
head on shot can quickly end the fight. However, a missed head on
attempt by your opponent can be used
against them. If you are maneuvering into
your post merge turn while your opponent is trying to line up a
shot, you've just gained an angles advantage by starting your turn
before them.
Enter the merge point with your lift vector pointed toward your next
turn:
The sooner you have your lift vector oriented for your next
turn, the sooner you can start your turn. However, this is trumped
by 1. Your opponents position may force you to avoid their guns
before you can orient your lift vector.
Try to get your opponent to pass through your lift vector at the
merge:
This allows you to turn into them, rather than around to
them. This also can allow you to start turning before the merge
point. This is trumped by 1. and 2. It's not worth attempting if it
will commit your lift vector into a turn that you don't want to
make, or if you're exposing yourself to guns in the process.
Post
merge turns
If
we want to try to enter the merge point with our lift vector oriented
on our next turn, then we need to have an idea of what our next turn
will be. For that, let's look at a few possible choices of post merge
turns, and how they interact with each other.
Immelman vs Flat Turn
An Immelman
spends a majority of its turn thrusting directly against
gravity. That means we are slowing down at a quicker rate than with
many other maneuvers. This can be useful for reaching a desired
cornering speed quickly. We also are exchanging energy states. We are
trading speed for altitude. From this higher position, we could
thrust with gravity (dive) and gain much of our speed back if needed.
With a Flat Turn,
all of our speed loss is due to drag. We are not
slowing down as quickly as with an
Immelman,
and we are not exchanging energy states. The only way we
can gain speed is by going lower than our starting altitude. Let's
look at an illustration of how we can expect them to stack up against
each other after a merge.
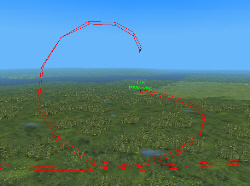 With the exact same plane type and load out,
the plane that did the Immelman clearly beats the flat turning
plane. Notice how the turn radius of the Immelman tightens as its
speed decreases. Also notice its position on top of the other
plane, where it has the force of gravity at its back. In short we
can expect: With the exact same plane type and load out,
the plane that did the Immelman clearly beats the flat turning
plane. Notice how the turn radius of the Immelman tightens as its
speed decreases. Also notice its position on top of the other
plane, where it has the force of gravity at its back. In short we
can expect:
Immelman beats a Flat Turn
Flat Turn vs Split-S
With a Split-S, we are doing
the opposite of an Immelman.
Gravity is working with our
thrust to accelerate us even faster. This can be a
problem if we are already at or near our desired cornering speed.
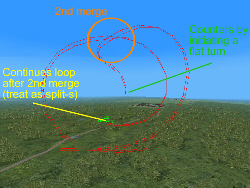
This turn match up usually happens two or more merges into a
fight, in this case it's the 2nd merge. What happens is
that while the plane performing the Split-S is accelerating
through his turn, the opponent, delays his own acceleration while
still reversing his heading with a Flat Turn. Once the Split-S
planes 3-9 line crosses underneath him, he can then nose down and
orient his lift vector to follow. In short:
Flat Turn beats a Split-S
Immelman vs Split-S
This turn match up also usually happens two or more merges into a fight.
In the other examples, the planes are roughly staying within reach of each
others turn radius. In this case, the turns head in opposite directions, and
take place outside the radius of each other, so the turn radius and rates
are usually
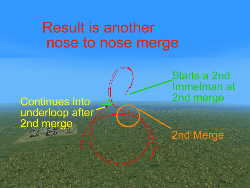 irrelevant because they separate enough for both planes to
complete a turn and re-merge. irrelevant because they separate enough for both planes to
complete a turn and re-merge.
Because of excessive speed, a Split-S
on an initial merge is a different situation, and is very rarely countered with an
Immelman.
This may be demonstrated in the future, but for now I'll say “Don't
Split-S into an initial merge. It's a bad idea.”
Immelman vs Split-S is
a draw
Initiating a Merge
Now that we've
determined than an Immelman
is often a good turn choice after a merge, let's look at how to initiate
merge to try to gain an advantage at the merge with a lead turn for an Immelman.
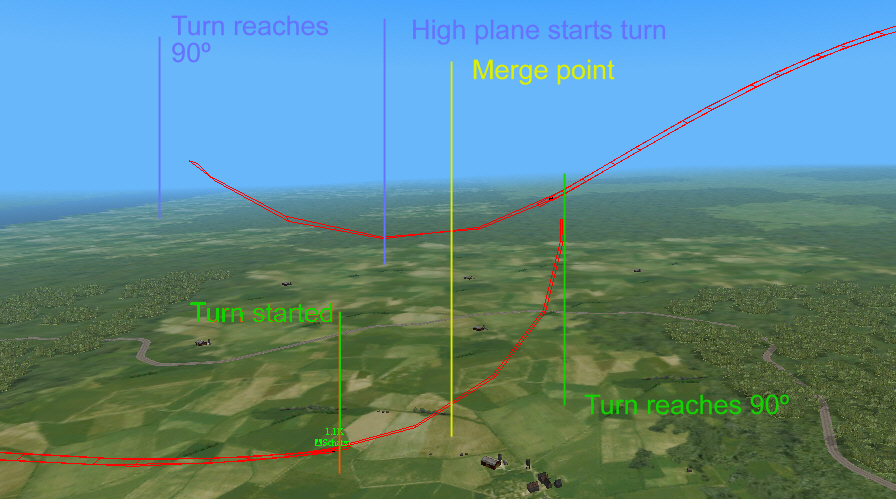
This figure shows a
number of components needed for a lead turning merge. Schatzi plans
on doing an Immelman after the merge. For an Immelman she wants to
have her lift vector pointing up. So to have the opponent pass
through her lift vector at the merge, she wants them to pass over top
of her at the merge. To accomplish this, on approach to the merge,
she dives to a point under the merge. She is trying to achieve
“vertical separation” at the merge. This has a number of
beneficial side effects. It forces the
opponent to chase her down to the merge. As they close, the opponent
will have to increasingly angle the nose down even more. The problem
for the opponent is that his nose is being drawn in the opposite
direction of his initial turn. If the opponent wants to attempt a
head on shot, this effect will be even worse. Not only that, but it
forces them to either go negative G, or invert to make a shot. This
fulfills the point of “Avoid
the opponents guns”. Looking
at the figure, notice that the higher plane's flight path leaves it
slightly nose down at the merge point even after giving up the race
to get under the merge.
Now look at
Schatzi's flight path at the merge point. It is more than 25º
nose up. This is part of the reason we are seeking to have our
opponent pass through our lift vector at the merge. Under this
condition, as soon as the other planes flight path crosses through
her “imaginary” projected best turn arc, she can start
her turn. As you can see in the figure, this can mean starting your
turn well before the merge point. Using the Merge Point as our
reference, Schatzi has nearly a 40º angles advantage at the
merge! If the opponent on the other hand tries to turn before the
merge, they will place themselves in front of Schatzi's potential
flight path, making matters worse. This forces the opponent to
actually reach the merge point before they can start maneuvering.
But that's not all!
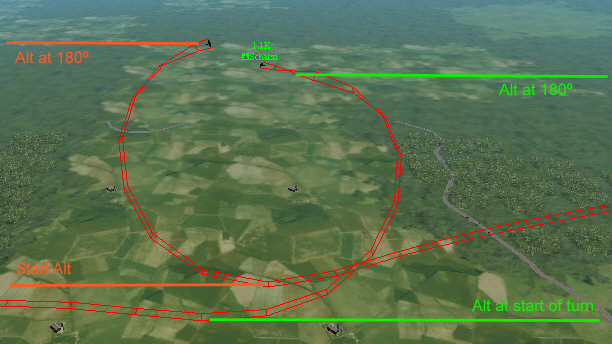
If we removed the angles advantage from the lead turn, the plane
“under the merge” still has a positional advantage. Looking
at the next figure we see the two opponents performing nearly identical
turns. However, since “vertical separation” has offset their
starting altitudes of their respective turns, it results in the plane
starting under the merge also being under the 2nd merge. At the 2nd
merge that means they are inside their opponents turn radius, and have
gun solutions.
Overview
As a baseline, the merge and post turn merge examples were done
with same plane types and same fuel load. Meaning with equal plane
capabilities, that is how much advantage
can be gained with merge tactics and turn/counter turn choices.
With similar planes we can expect the same results, but it is up to
the less maneuverable of the two planes to try to successfully
use these tactics before the fight devolves into a sustained turn
fight. Sustained turns are where any differences between two planes
turn performances will be most pronounced. Even between exact same
plane types, we can see the effects of weight differences (mainly
fuel load) on their turn performance
during sustained turns.
Between dissimilar planes, we can still often apply the same
tactics. However, it becomes even more imperative
for the less maneuverable plane to win the merge if they intend on
out turning their opponent. In that situation, not only does the less
maneuverable plane want to avoid sustained turns, but they also want
to gain an advantage almost immediately because they will likely lose
ground with every merge and reversal. If they gain trail position on
their opponent early, it will be more difficult for the opponent to use
their turn performance to recover. There are limits with
dissimilar plane types though. If we look at an A6M2 vs an FW-190a8
as an example. We'll find that that for every turn the FW performs, the
A6M will complete a turn and a quarter, and it will do it well inside
the turn of the FW. What that means is if we compare
those two models in post merge turns, the A6M could choose all the
"wrong" turns, and still likely get gun solutions first
simply due to its turn performance.
So when considering ACM choices, an important part of the decision
should be base on your knowledge of your, and your opponent's plane
performance. This does not mean that you need to memorize specific
stats for every plane type available in AH,
but you should have an idea of how the opponent's plane compares
to yours for relative turning performance, speed, and acceleration.
Another factor to consider is the strengths and weaknesses
of your respective planes. Playing to the strengths
of your plane can be obvious, but it can also take some very detailed
knowledge. A plane that should lose a fight at slow speeds in a
specific match-up may very well have the upper
hand at a higher speed range. A plane that should lose a
sustained flat turn fight in a match-up, may match, or even better
their opponent in vertical turns. These kinds of situation specific details,
as you discover them during fights, are worth remembering for the next time.
So while this is intended to give you a framework or point of
reference for understanding ACM, it takes practical experience to
actually do it, and know what to expect in a specific situation. As
demonstrated, a merge can be a key turning point
at any time in a fight. Consider this, at a closing speed of 750 mph
on a merge, in 1 second the separation between planes will change 366
yards. If you start your turn 1 second late during merge, that 366
yards could mean the difference between a winning, neutral, or losing
position. Add to that heading into a merge, we are making a best
guess at where a “merge point” will be. All this takes
experience to judge timing and position, even if you understand what
you should do and why. Don't become discouraged if it takes awhile to
develop those skills. Just by reading this article, you have
knowledge that may take the unaided player months to figure out on
their own.
One or all of the post merge turn examples can be applicable
to almost any fight at some point. There are certainly more named
maneuvers, and more variations on merges and turn match ups that
could be studied. However, this is a good point to suggest you
practice, practice, and practice some more with the information here.
Concepts such as Energy Management,
Situational Awareness, Gunnery Technique and Practice, and
using Lead, Pure and Lag Pursuit to manage separation and angles, are all
important aspects of ACM, but they go hand in hand with knowing what
to do next, and what possible out comes will result. The ACM
discussed here and those concepts are all things you can practice
with a buddy in the Training Arena or Dueling Arena anytime.
Good Luck!
|

